Thursday, July 30, 2009

KBB #12 : Cheese Souffles


Bikin pe-er KBB kali ini seruuuuuuu banget. Gimana ngga seru, kalau ngerjainnya bareng-bareng sampe 10 orang saja. Asik kan?
Kok bisa? iya lah bisa, KBB Bandung gitu loh.. hehehe.. Masih merasa tetep bagian dari KBB Bandung meskipun sudah nun jauh disana :D. Kebeneran banget, saya lagi mudik (lagi) pas ada pilpres kemaren. Seneng deh bisa ketemu temen2 baru yang selama ini hanya bisa menyapa di dunia maya saja. Ada mba Emma sang pakar, ada Mira, dan mba Ine yang lagi berlibur di Bandung juga. Yang laennya tentu saja Yohana sang tuan rumah, teh Tyas, teh Molly, teh Uci, Yuyun, dan mba Atiek.
Jadi nih, meskipun kita banyakan tapi tetep dibentuk kelompok2 kecil supaya setiap orang tetap mengerjakan pe-er-nya masing2. Kemaren itu saya sekelompok sama teh Molly (plus Trixie *haii..*). Tapi biar hasilnya tidak terlalu banyak, bikinnya hanya 1/3 resep saja (eh 1/3 kan ya teh Mol? lupa euy).

Oya, coba kita bayangin bersama-sama, kalau bahan-bahan souffle, bahan makanan untuk makan siang, props buat motret, ramekin kecil sampe gede, hiasan sayur / buah, semuanya tumplek diatas meja dapur? Pastinya cuman satu kata : Heboh!
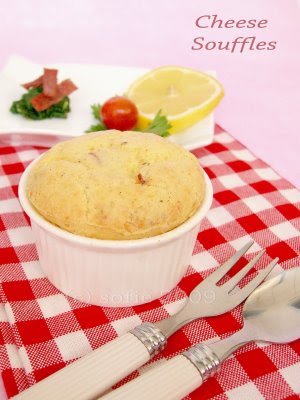


Cheese Souffles
Sumber: The Perfect Cookbook by David Herbert. Penguin Books Australia Ltd 2003.

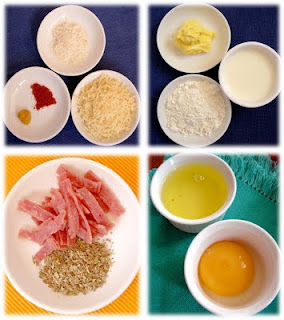
100g unsalted butter
½ cup plain (all-purpose) flour
300ml milk
1 cup grated cheddar
2 Tbs freshly grated parmesan
½ tsp Dijon mustard
pinch cayenne pepper
4 eggs, separated


1. Preheat the oven to 190C (375F, Gas Mark 5). Grease and lightly flour six ½-cup-capacity souffle dishes.
2. Melt butter in a small saucepan over low heat. Add the flour and cook, stirring constantly, for 1 minute. Gradually add the milk and whisk continuously over medium heat until the mixture is smooth, thickens and comes to the boil. Allow to cool for 5 minutes.


3. Transfer the mixture to a bowl and stir in the cheddar, parmesan, mustard and cayenne pepper. Mix well.
4. Lightly beat the egg yolks and add these to the cheese mixture. Mix well.


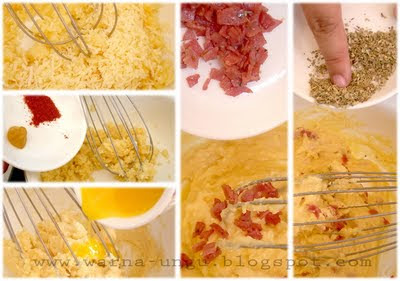
saya dan teh Molly memodifikasi resep dengan menambahkan
smoked beef dan oregano


5. With an electric mixer, whisk the egg whites in a clean bowl until firm peaks form. Fold a quarter of the whites through the cheese mixture to slacken it slightly, then gently fold through the remaining whites.
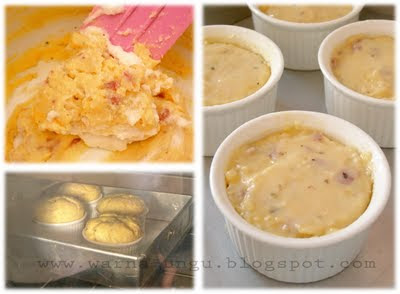
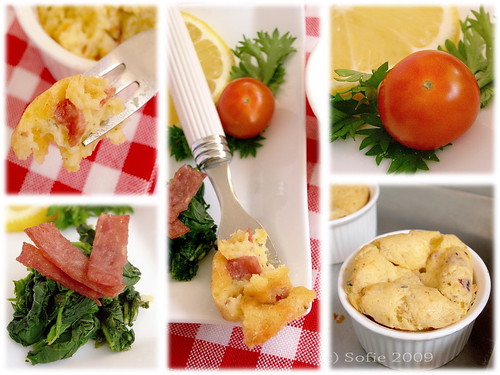
6. Spoon the mixture into the prepared dishes and bake for 20-25 minutes, or until risen and golden. Don't be tempted to open the oven until the souffles have risen. Serve immediately.


Baru pertama kali ini nyobain dan ngerasain yang namanya souffle. Ternyata mirip kayak sus gitu teksturnya. Berhubung kemaren rasanya sih ngga ada yang bikin plain, jadinya ngga tahu persis rasa asli resep ini. Yang jelas, pake smoked beef dan oregano rasanya mantap. Nyobain yang Yohana dan mba Ine yang pake bayam enak juga, tapi menurut lidah saya nih jadinya kurang nendang ya. Masih juara yang pake smoked beef hehehe..

Cheese Souffle


Beberapa tips dari mba Emma :
- olesi ramekin dengan mentega sampai rata betul. Kemudian taburi dengan terigu. Bisa juga terigu dicampur dulu dengan parutan keju, supaya nanti ada keju yang nempel di dinding souffle saat dia naek. Tapi kemaren berhubung naeknya ngga terlalu tinggi jadinya ngga keliatan juga tuh hehe..
- mengisi adonan harus sampai penuh betul biar naiknya semakin tinggi
- ratakan permukaan adonan dengan punggung sendok yang sudah dicelup air, supaya permukaannya rata dan hasil akhirnya datar sempurna.

Bikinnya ternyata tidak sesulit yang dibayangkan, tapi seperti yang sudah digembor-gemborkan semua orang bagian teribet adalah proses memotretnya. Ya ampuuunn... cepet banget mingpesnya. Coba lihat foto yang masih di dalam oven. Bagus kan? nah, itu cuma bertahan bentar aja. Waktu oven mau dibuka, semua udah ditereakin buat pegang lap masing2. Jadi begitu dikeluarin semuanya langsung berhamburan ke pojok masing2.. heheh.. lucu pisan lah kalau diinget2 lagi.


Ooppss.. hampir lupa, thanks ya buat mba Zita yang udah jadi host bulan ini.

Sunday, July 26, 2009

Oreo cookies.. my homemade :)

It was all started when I found a jar of dark cocoa powder in my kitchen cupboard. Actually I haven't used it, because I bought it accidently. I asked for crunched oreo biscuit but the shop employee gave me a bag of dark cocoa powder. Then I asked my friends what kind of cocoa it is.
After a nice discussion, mba Arfi, challenged us to make for our own homemade oreo. What a great idea. We searching for the recipes, and then tried one of them.

Just a glympse about cocoa powder from Wikipedia.

Cocoa powder : There are two types of unsweetened baking cocoa available: natural cocoa (like the sort produced by Hershey's and Nestlé using the Broma process), and Dutch-process cocoa (such as the Hershey's European Style Cocoa and the Droste brand). Both are made by pulverising partially defatted chocolate liquor and removing nearly all the cocoa butter. Natural cocoa is light in colour and somewhat acidic with a strong chocolate flavour. Natural cocoa is commonly used in recipes which call for baking soda. Because baking soda is an alkali, combining it with natural cocoa creates a leavening action that allows the batter to rise during baking. Dutch-process cocoa is processed with alkali to neutralise its natural acidity. Dutch cocoa is slightly milder in taste, with a deeper and warmer colour than natural cocoa. Dutch-process cocoa is frequently used for chocolate drinks such as hot chocolate due to its ease in blending with liquids. Unfortunately, Dutch processing destroys most of the flavonoids present in cocoa.

Homemade Oreo


I used recipe from Smitten Kitchen. Go to the link, so you can read all the comments and more discussion about the cookies.

Here is the recipe :
Homemade Oreos
Makes 25 to 30 sandwich cookies

For the chocolate wafers:
1 1/4 cups all-purpose flour
1/2 cup unsweetened Dutch process cocoa (I mix : 1/4 van houten cocoa + 1/4 dark cocoa)
1 teaspoon baking soda
1/4 teaspoon baking powder
1/4 teaspoon salt (I don't use it)
1 to 1 1/2 cups sugar (I only use 1 cup)
1/2 cup + 2 tablespoons (1 1/4 sticks) room-temperature, unsalted butter (I use salted butter)
1 large egg

For the filling:
1/4 cup (1/2 stick) room-temperature, unsalted butter
1/4 cup vegetable shortening2 cups sifted confectioners’ sugar
2 teaspoons vanilla extract

Directions:
1. Set two racks in the middle of the oven. Preheat to 375°F.
2. In a food processor, or bowl of an electric mixer, thoroughly mix the flour, cocoa, baking soda and powder, salt, and sugar. While pulsing, or on low speed, add the butter, and then the egg. Continue processing or mixing until dough comes together in a mass.
3. Take rounded teaspoons of batter and place on a parchment paper-lined baking sheet approximately two inches apart. With moistened hands, slightly flatten the dough. Bake for 9 minutes, rotating once for even baking. Set baking sheets on a rack to cool.
4. To make the cream, place butter and shortening in a mixing bowl, and at low speed, gradually beat in the sugar and vanilla. Turn the mixer on high and beat for 2 to 3 minutes until filling is light and fluffy.
5. To assemble the cookies, in a pastry bag with a 1/2 inch, round tip, pipe teaspoon-size blobs of cream into the center of one cookie. Place another cookie, equal in size to the first, on top of the cream. Lightly press, to work the filling evenly to the outsides of the cookie. Continue this process until all the cookies have been sandwiched with cream. Dunk generously in a large glass of milk.


The texture quite different from original oreo. This one is crunchy and sweet, even I reduced the sugar. Then I go back to the smitten kitchen blog, read it carefully and slowly. That's it! I miss some information there. She said that it is a sweet cookie. If we imagine the taste of original one, the wafers are fairly un-sweet and actually on the slightly salty side, which contrasts with the super-sweetness of the filling.

If we just eat without the filling, the taste is amazing. The flavour of cocoa powder, a little bitter and slightly salty. But according to my taste, if we eat a whole biscuit with a filling, it's still a little bit too sweet. Next time I will reduce much sugar.


Homemade Oreo

Wanna try this by yourself? Come on.. Enjoy the cookie :D

This photo is also my entry for this month theme in Click event organized by Bee and Jai at Jugalbandi. To join the event, this is the LINK.


Tuesday, July 21, 2009

Cupcake project

Udah lama (eeh.. baru setahun dink) berkecimpung di dunia cupcake, tapi belom pernah bikin cupcake yang pake seriusan segala. Paling banter bikin brownies, buttercake tanpa embel2 dihias ini itu. hehehe.. Eeeehh.. jangan salah, sy bukan (baca: belum) jualan cupcake, tapi mendukung bakul2 cupcake buat mengemas cupcake-nya jadi cantik, ngga goyang-goyang kalo dikirim ke tempat tujuan, atau biar ada pilihan aja selain pake kemasan plastik. Ooppsss sorii.. malah bikin iklan disini :D.

Penasaran banget pengen bermain sama fondant. Pertama kali nyobain ngoprek fondant pake acara nekat, karena masih jaman2nya bikin sponge cake yang selalu bantet, belom pernah tahu gimana penampakan fondant sebelumnya, dan tanpa ada berbekal kursus atau latbar apapun juga. Naahh.. karena sekarang udah berseliweran banget hasil kreasi temen2 yang berkutat dengan fondant ini, jadinya ngebet pisaann..

Waktu acara mudik ke Bandung kemaren kok tiba2 kepikiran bikin cupcake ini euy. Tapi males dong ah kalau pake acara bawa-bawa peralatan perang baking juga. Trus keinget, waktu itu pernah baca di milis kalau mba Yuli kue rumahan jual fondant yang udah diwarnai. Aahh ini dia, jadi ngga perlu ribet kan? Siiippp

Kebetulan nih, ada acara kumpul2 a.k.a reuni sama temen2 sma. Tadinya, reunian ini buat farewell salah satu temen kita yang mau sekolah lagi ke aussie. Tapi singkat cerita, malah dia ngga jadi datang, padahal kan bintang tamu hehehe.. Jadinya, tema study langsung putar haluan jadi flower aja. Sekalian nyobain cetakan baru. Bukaan.. bukan cetakan fondant, tapi cetakan kukis aja kok.
my 1st fondant cupcake

Whuaahh.. miskin ide banget ngga siih?? hehehe..
Tapi lumayan lah, buat pemula kayak sy mah. Oya, fondantnya pake bakels. Ternyata rasanya lebih enak ya daripada yang dulu pernah sy pake. Jadi ketagihan oii.. ntar mau nyobain lagi aahh..

Cupcake Jeruk
Sumber : Majalah Sedap 2/X/2009

Bahan :
8 kuning telur
2 putih telur
75 gr gula pasir
75 gr tepung terigu protein sedang
15 gr susu bubuk
60 gr margarine, lelehkan
1 sdm sirup jeruk (me : sunquick)

Topping : (ngga pake, langsung pake fondant ajah)
100 gram butter cream
75 gr jeruk kalengan

Cara Membuat :
Kocok telur dan gula pasir sampai mengembang
Tambahkan terigu dan susu bubuk yang sudah diayak kemudian diaduk rata
Masukkan margarine leleh dan sirup jeruk sambil diaduk perlahan.
Tuang di cetakan
Oven 15 menit , dengan suhu 190° C sampai matang.
Hias

Alhamdulillah.. sekarang kutukan sponge cake sudah sedikit demi sedikit menghilang. heheh.. tapi tetep belum pede bener. Masih dag-dig-dug jeger setiap kali bikinnya :D
Oya, sambung cerita yang tadi. Jadi, karena bikin cupcakenya sedikit (cuman jadi 7 buah sajah), jadi tiap orang cuman dapet 1 heheh.. Yang bawa pasangan ngga kebagean. Soriiii..
Blog Widget by LinkWithin